
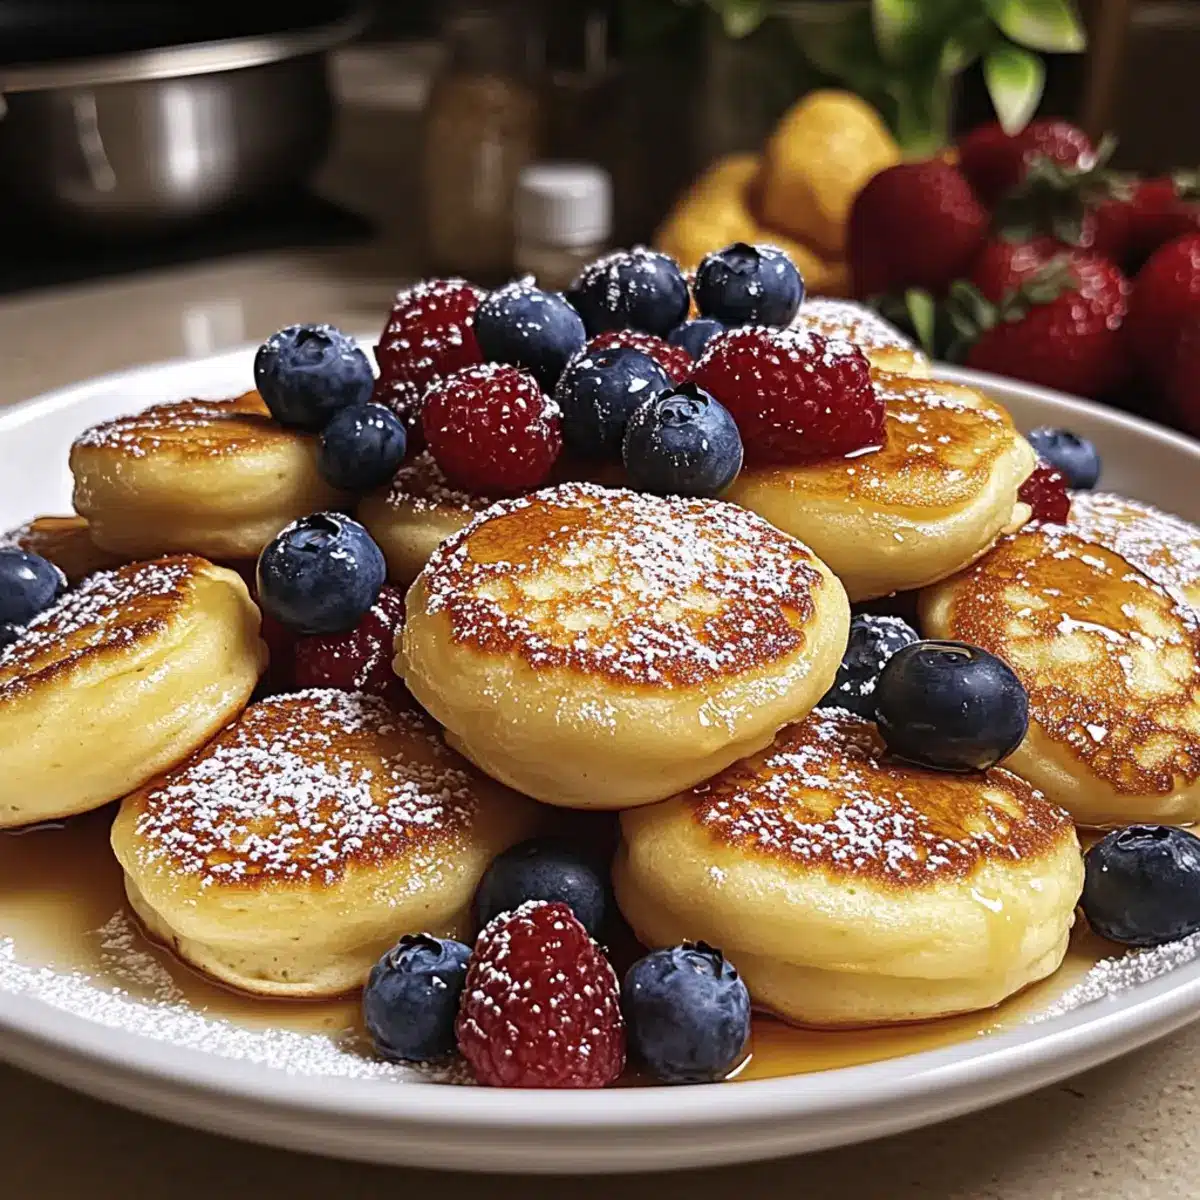
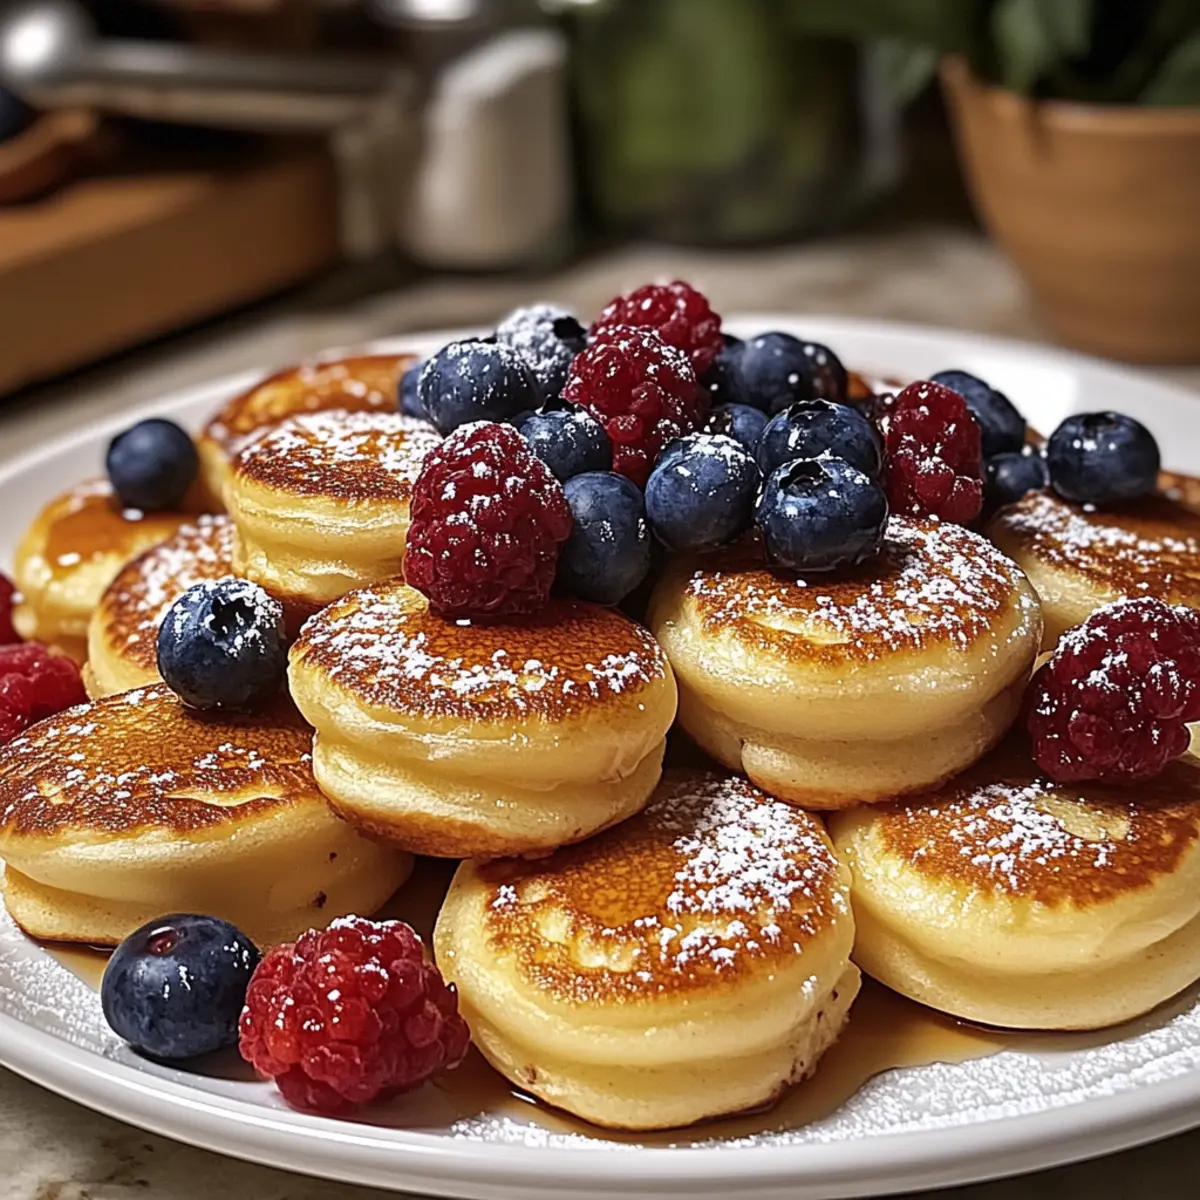
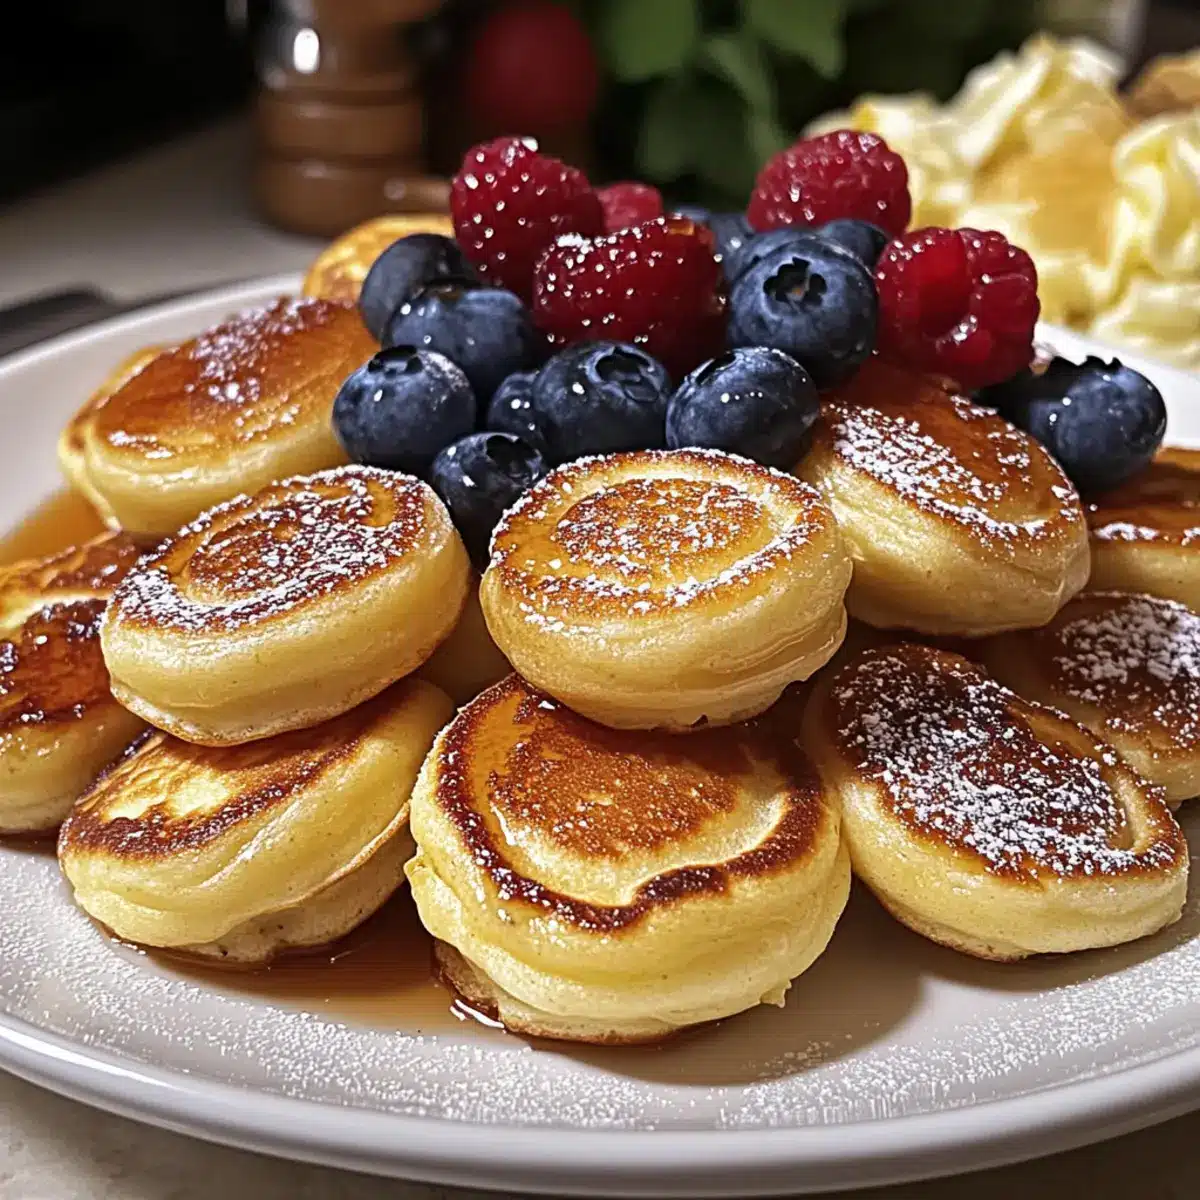
While flipping through my latest brunch inspirations, I stumbled upon a delightful marvel: Pancake Poppers. These bite-sized breakfast treasures pack a fluffy punch and can be whipped up in under 30 minutes—perfect for busy mornings or leisurely weekend gatherings. What I love most is their versatility; you can customize these poppers with your favorite fruits, nuts, or even chocolate chips to cater to everyone’s taste buds. They’re kid-friendly too, making them an easy win for both parents and picky eaters alike. Imagine serving a warm platter of these golden delights, with everyone reaching for a popper or two! Are you ready to transform your mornings with this fun twist on a classic favorite?
Why are Pancake Poppers a Must-Try?
Bite-Sized Delight: These pancake poppers bring joy to the breakfast table with their fun, mini form—it’s like having a pancake in every bite!
Customizable Flavors: With endless variations, you can easily modify the recipe for your family’s preferences by adding fruits, nuts, or chocolate chips.
Quick & Easy: Ready in under 30 minutes, these poppers are your new go-to meal for busy mornings. They also make perfect, kid-friendly snacks!
Crowd-Pleasing Appeal: Whether for a cozy brunch with friends or a festive family gathering, these poppers will impress every guest. Don’t forget to serve them warm with maple syrup or yogurt for an extra special touch!
Perfect for Meal Prep: Make a batch ahead of time and store them for quick breakfasts during the week—simply reheat and enjoy!
Bring a delightful twist to your mornings and explore how to elevate your brunch game with pancake poppers!
Pancake Poppers Ingredients
For the Batter
- All-Purpose Flour – Provides structure; you can substitute with gluten-free flour for a gluten-free option.
- Sugar – Adds sweetness; feel free to use brown sugar for a richer flavor.
- Baking Powder – Acts as a leavening agent for fluffiness; ensure it’s fresh for the best results.
- Salt – Enhances flavor; opting for sea salt can elevate the taste experience.
- Milk – Hydrates the batter; non-dairy alternatives like almond or oat milk work well for a dairy-free recipe.
- Egg – Binds all ingredients together; for a vegan alternative, try using a flax egg.
- Melted Butter – Adds richness; you can substitute with coconut oil for a dairy-free alternative.
- Vanilla Extract – Infuses the batter with warmth; pure extract is best for optimal flavor.
For Optional Flavor Additions
- Fresh Fruits (e.g., blueberries, raspberries, bananas) – Adds a burst of flavor and nutrition; choose your favorites to customize.
- Chocolate Chips or Nuts – Optional mix-ins for added texture; they bring a delicious twist to your pancake poppers.
- Cinnamon or Nutmeg – Optional spices for a touch of warmth and depth of flavor; these can transform your poppers into a cozy treat.
Embrace the joy of making pancake poppers and customize them to your heart’s content!
Step‑by‑Step Instructions for Pancake Poppers
Step 1: Preheat the Oven or Skillet
Start by preheating your oven to 350°F (175°C) or place a skillet over medium heat. This initial step is crucial for ensuring the pancake poppers cook evenly and achieve that perfect golden-brown exterior. If you’re using the skillet, make sure it’s hot before adding any batter.
Step 2: Combine Dry Ingredients
In a large mixing bowl, whisk together the all-purpose flour, sugar, baking powder, and salt. Mix until everything is well blended, which will help the dry ingredients incorporate smoothly into your pancake poppers batter. It’s best to use a whisk to aerate the flour, creating a fluffy batter when combined with wet ingredients.
Step 3: Mix Wet Ingredients
In a separate bowl, combine the milk, egg, melted butter, and vanilla extract. Whisk these ingredients together until they are fully mixed and homogenous. This step is essential for combining your liquid ingredients, ensuring that every bite of your pancake poppers is flavorful and consistent.
Step 4: Combine Wet and Dry Ingredients
Pour the wet mixture into the bowl of dry ingredients. Gently stir with a spatula until just combined; be careful not to overmix. A few lumps are okay—overmixing can lead to dense pancake poppers instead of the light, fluffy texture we desire.
Step 5: Fold in Optional Ingredients
If you’re adding any optional mix-ins like fresh fruits or chocolate chips, gently fold them into the batter now. This step allows you to customize your pancake poppers according to your family’s taste preferences, ensuring a delightful surprise in each bite.
Step 6: Prepare the Baking Tin or Skillet
Grease a mini muffin tin with cooking spray or a small amount of melted butter, or add a touch of oil to your skillet. This will prevent your pancake poppers from sticking and make it easy to pop them out once they are cooked. A well-prepared cooking surface is key to a successful batch!
Step 7: Pour Batter into Molds
Spoon the batter into the greased muffin cups, filling each about two-thirds full. This gives the pancake poppers room to rise as they bake or cook. If you’re using a skillet, use a small scoop or ladle to place dollops of batter directly into the heated pan.
Step 8: Bake or Cook Until Golden
If baking, place the muffin tin in the oven and bake for 10-12 minutes, or until the tops are golden and a toothpick inserted into the center comes out clean. For the skillet method, cook for about 2-3 minutes on each side until golden brown. Keep an eye on them as they cook—each side should be perfectly puffed.
Step 9: Cool Before Serving
Once done, remove your pancake poppers from the oven or skillet and let them cool slightly on a wire rack. This resting period is key for maintaining their fluffy texture. Serve them warm with your favorite toppings like maple syrup or yogurt to make your breakfast even more delightful.
How to Store and Freeze Pancake Poppers
-
Room Temperature: Pancake poppers can be kept at room temperature for up to 2 hours if serving immediately; they are best enjoyed warm.
-
Fridge: Store leftover pancake poppers in an airtight container in the fridge for up to 3 days. Allow them to cool completely before sealing to avoid moisture buildup.
-
Freezer: To freeze, place fully cooled pancake poppers in a single layer on a baking sheet. Once frozen solid, transfer them to an airtight container or freezer bag for up to 2 months.
-
Reheating: When ready to enjoy, reheat thawed pancake poppers in a preheated oven at 350°F (175°C) for about 10 minutes, or microwave for 30-60 seconds until heated through. Enjoy the warm, fluffy goodness again!
Expert Tips for Perfect Pancake Poppers
-
Gentle Mixing: Avoid overmixing the batter to ensure light and fluffy pancake poppers. A few lumps are completely fine!
-
Resting Time: Let the batter rest for 5-10 minutes before cooking; this helps the ingredients meld together for an airy texture.
-
Fresh Ingredients: Always check that your baking powder is fresh; stale leavening agents can lead to dense pancake poppers rather than fluffy delights.
-
Size Consistency: Use a cookie scoop for uniform batter portions; this ensures even cooking and delightful bite-sized treats.
-
Temperature Check: Make sure your skillet or oven is at the right temperature before cooking; this is crucial for achieving that perfect golden-brown crust.
-
Experiment with Toppings: Don’t hesitate to try different toppings like yogurt, fresh fruit, or a dusting of powdered sugar to elevate your pancake poppers experience!
Make Ahead Options
These pancake poppers are a fantastic option for meal prep! You can prepare the batter up to 24 hours in advance by mixing all the dry ingredients and wet ingredients separately, then refrigerating both until you’re ready to cook. If you opt to make the poppers ahead, they can be stored in an airtight container for up to 3 days once baked. To maintain quality, allow them to cool completely before placing them in the container. When you’re ready to serve, simply reheat them in the oven or microwave for a quick, warm breakfast that tastes just as delicious as when they were freshly made. Enjoy your hassle-free mornings!
Pancake Poppers Variations & Substitutions
Feel free to get creative and tailor your pancake poppers to suit your taste buds and dietary preferences!
- Gluten-Free: Substitute all-purpose flour with a gluten-free flour blend to make these poppers inclusive for everyone.
- Dairy-Free: Swap regular milk for almond or oat milk, and replace butter with coconut oil for a creamy touch without dairy.
- Vegan Friendly: Use a flax egg in place of a chicken egg to cater to your vegan friends and family.
- Fruity Fun: Instead of berries, add chopped strawberries or peaches for a fresh summer twist that sings with flavor.
- Extra Sweetness: Boost the flavor profile by adding a splash of maple syrup directly into the batter for a delightful sweetness.
- Spice It Up: Toss in a teaspoon of pumpkin pie spice or ground ginger to add a zesty flair perfect for cozy autumn days.
- Nutty Crunch: Incorporate chopped walnuts or pecans into the batter for a delightful texture and earthy flavor that will leave everyone wanting more.
- Choco-Lovers Delight: Mix in a handful of semi-sweet or dark chocolate chips for that extra indulgence that both kids and adults adore.
No matter how you twist these pancake poppers, they’re bound to delight! And if you’re looking for some serving ideas, try pairing them with a dollop of yogurt or a side of fresh fruit. Enjoy experimenting!
What to Serve with Flavor-Packed Pancake Poppers
Brighten your table with wonderful accompaniments that elevate your pancake experience into a delightful feast.
- Creamy Greek Yogurt: Serve alongside a bowl of creamy Greek yogurt for a cool contrast that balances the sweetness. It pairs beautifully with fresh fruits too!
- Maple Syrup Drizzle: A classic choice, the rich sweetness of maple syrup enhances the pancake poppers and adds a nostalgic touch to breakfast.
- Fresh Berries Medley: Top your plate with a vibrant mix of strawberries, blueberries, and raspberries for a fresh burst of flavor and color. They’re nature’s candy!
- Crispy Bacon Side: The savory crunch of crispy bacon offers a satisfying balance to the sweetness of your pancake poppers, making each bite truly unforgettable.
- Fruit Smoothie: Blend up a refreshing fruit smoothie to sip while you enjoy your warm poppers; it adds a nutritious touch and can be customized to suit any palate.
- Nutty Granola: A sprinkle of nutty granola adds delightful crunch and texture, making your pancake poppers feel even more indulgent while giving an extra layer of flavor.
- Honey Drizzle: A light drizzle of honey offers a floral sweetness that complements the pancakes’ fluffiness, creating a perfect harmony of flavors.
- Dark Chocolate Chips: For a sweeter twist, serve some melted dark chocolate or chocolate syrup on the side as a decadent dessert option after brunch.
Combine these delightful additions to create a celebrated breakfast spread that everyone will love!
Pancake Poppers Recipe FAQs
What type of flour should I use for pancake poppers?
All-purpose flour is recommended for the best structure and texture. If you need a gluten-free option, you can substitute it with a gluten-free flour blend, which works wonderfully in this recipe. Make sure your gluten-free flour contains xanthan gum for better results!
How should I store leftover pancake poppers?
To store leftovers, place pancake poppers in an airtight container after allowing them to cool completely. They will keep in the fridge for up to 3 days. Be mindful to check for moisture before sealing, as that can lead to sogginess. If you’re planning to keep them longer, freezing is a great alternative!
Can I freeze pancake poppers?
Absolutely! After cooling, spread your pancake poppers on a baking sheet in a single layer and freeze until solid. Once frozen, transfer them to an airtight container or freezer bag, where they can be stored for up to 2 months. This method helps prevent them from sticking together.
What can I do if my pancake poppers turn out dense?
If your pancake poppers are dense, it might be due to overmixing the batter or using stale baking powder. Make sure to stir until just combined and allow your baking powder to be fresh before use. For future batches, let the batter rest for 5-10 minutes to relax the gluten and enhance fluffiness.
Are pancake poppers safe for children with allergies?
While pancake poppers are generally kid-friendly, always check the specific ingredient labels for allergens. If your child has dairy allergies, substitute with non-dairy milk and coconut oil. You can also replace the egg with a flax egg (1 tablespoon of flaxseed meal mixed with 2.5 tablespoons of water) for a vegan version.

Irresistible Pancake Poppers: Customizable Bites of Joy
Ingredients
Equipment
Method
- Preheat your oven to 350°F (175°C) or place a skillet over medium heat.
- In a large bowl, whisk together the all-purpose flour, sugar, baking powder, and salt.
- In a separate bowl, combine the milk, egg, melted butter, and vanilla extract.
- Pour the wet mixture into the bowl of dry ingredients and stir gently until just combined.
- Fold in any optional ingredients like fruits or chocolate chips.
- Grease a mini muffin tin or add oil to your skillet.
- Spoon the batter into the greased muffin cups, filling each about two-thirds full.
- Bake for 10-12 minutes or cook in a skillet for about 2-3 minutes on each side until golden.
- Cool slightly on a wire rack before serving.
Leave a Reply