
As I stood in my kitchen, the aroma of sizzling chicken filled the air, instantly bringing me back to cherished family dinners. These Crispy Chicken Caesar Sandwiches not only bring the beloved flavors of the classic Caesar salad into a convenient handheld delight, but they also promise an easy dinner solution that everyone will love. In just 30 minutes, you can whip up this comfort food, featuring perfectly fried chicken, a refreshing homemade dressing, and a touch of garlic toast that elevates each bite. This recipe is excellent for those busy nights when you crave something satisfying without the hassle of complicated preparations. Ready to discover how to recreate this delectable dish? Let’s dive in!

Why Choose Chicken Caesar Sandwiches?
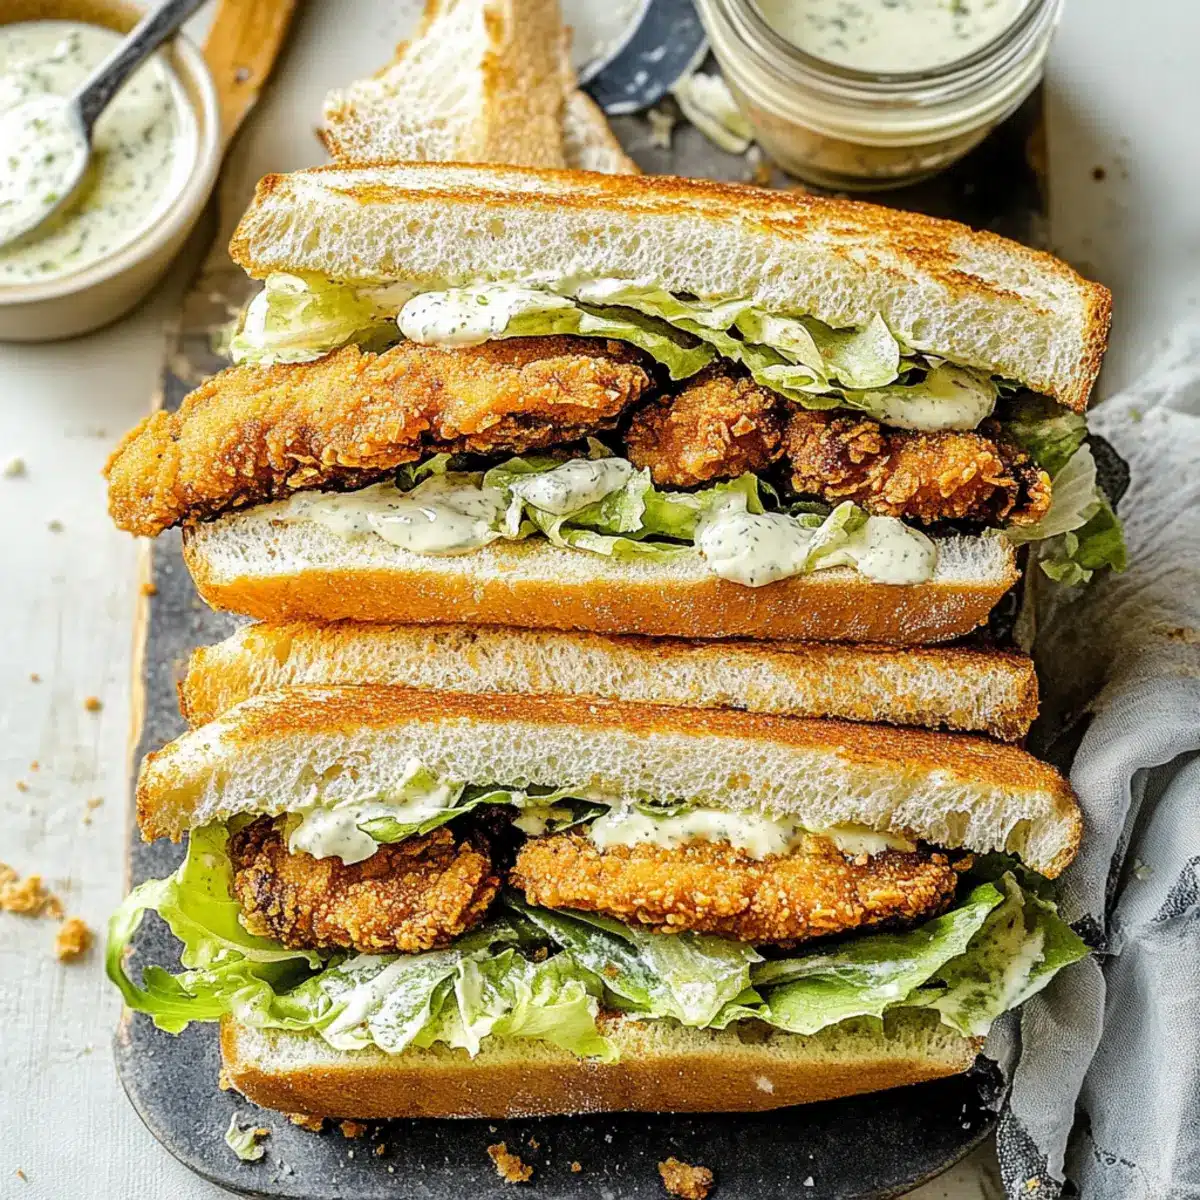
Comfort Food Delight: These sandwiches bring the rich, savory flavors of a classic Caesar salad right to your fingertips, making every bite a nostalgic experience.
Quick and Easy: Perfect for those busy nights, this recipe comes together in just 30 minutes!
Versatile Ingredients: Feel free to swap out chicken for turkey or tofu to cater to your dietary preferences. If you’re craving something different, check out our Mediterranean Tzatziki Chicken for a fresh twist!
Crispy and Crunchy: The combination of perfectly fried chicken and crunchy lettuce offers a satisfying texture, complemented by a rich homemade dressing.
Crowd-Pleaser: These sandwiches are ideal for bringing friends and family together, whether it’s a casual weeknight dinner or a festive gathering! Enjoy them with sides like potato chips or tater tots for a complete meal.
Chicken Caesar Sandwich Ingredients
• Perfect for crafting delightful sandwiches at home!
For the Chicken
- Chicken Breasts – The main protein packed with flavor; swap for turkey or tofu for a lighter twist.
- Egg – Essential for binding the crispy coating; for a vegan option, you can use a flax egg.
- Garlic Powder – Adds depth of flavor without overpowering; no substitutes necessary.
- Salt – Enhances all the flavors beautifully; adjust to taste.
- Pepper – A pinch for warmth and a hint of spice; fresh ground works best.
- Breadcrumbs – Provides that satisfying crunch; gluten-free breadcrumbs work great for gluten-sensitive diets.
- Panko – These Japanese-style breadcrumbs offer extra crispy texture; regular breadcrumbs can be used as an alternative.
- Vegetable Oil – For frying until golden and crispy; olive oil is an acceptable substitute if you prefer.
For the Garlic Butter
- Salted Butter – Gives richness to the garlic spread; use vegan butter for dairy-free!
- Garlic (minced and grated) – A base for delicious garlic flavor; fresh is best for potency.
- Parsley – Adds freshness and a pop of color; can be replaced with dried herbs if fresh isn’t available.
For the Homemade Dressing
- Mayo – Brings creaminess to the dressing and garlic spread; vegan mayo is perfect for a plant-based option.
- Sour Cream or Greek Yogurt – Creamy contrast in the dressing; use dairy-free yogurt for a vegan version.
- Parmesan Cheese – Offers a savory bite; swap with nutritional yeast for a vegan substitute.
- Lemon Juice – Brightens flavors in the dressing; vinegar works in a pinch!
- Dijon Mustard – Adds zing and depth; no substitutes necessary for that iconic Caesar taste.
- Anchovy Paste – A classic element of Caesar flavor; use capers for a vegetarian alternative.
- Worcestershire Sauce – Complements the dressing’s flavor profile; check for vegan versions if desired.
For the Salad and Assembly
- Romaine Lettuce – Crisp base for the Caesar components; feel free to use any other crunchy lettuce.
- Hoagies or Baguette – The perfect bread for your sandwich; lettuce wraps can offer a low-carb alternative.
Step‑by‑Step Instructions for Chicken Caesar Sandwiches
Step 1: Prepare Chicken Cutlets
Begin by slicing the chicken breasts horizontally into thin cutlets, about 1/2 inch thick. Set up a breading station by whisking an egg in a shallow bowl, and coating the cutlets in egg before dredging them through a mixture of breadcrumbs and Panko. Ensure every inch is evenly coated for that crispy texture in your Chicken Caesar Sandwiches.
Step 2: Fry Chicken
Heat vegetable oil in a large skillet over medium-high heat, reaching approximately 350°F. Carefully place the breaded chicken cutlets into the hot oil, ensuring they aren’t overcrowded. Fry for about 5 minutes or until golden brown and crispy, flipping halfway through for even cooking. Once done, remove the chicken and let it drain on paper towels to absorb excess oil.
Step 3: Make Garlic Butter
In a separate bowl, melt salted butter and add minced garlic, chopped parsley, and grated Parmesan cheese for a flavorful garlic butter spread. Mix well until combined. This delicious butter will beautifully enhance the flavor of the toast, making every bite of your Chicken Caesar Sandwiches extra special.
Step 4: Toast Bread
Slice your hoagies or baguette and spread the garlic butter mixture generously on each side. Preheat your oven to 450°F and place the bread slices on a baking sheet. Toast them in the oven for about 3-4 minutes, watching closely until they become golden and crispy. The aroma will be divine!
Step 5: Prepare Dressing
In a medium bowl, whisk together the mayonnaise, sour cream, grated Parmesan, lemon juice, Dijon mustard, anchovy paste, Worcestershire sauce, and grated garlic until smooth and creamy. This rich and tangy dressing will add an unforgettable flavor to your Chicken Caesar Sandwiches, bringing the essence of Caesar salad right into your meal.
Step 6: Toss Salad
In a large bowl, combine chopped romaine lettuce with 3-4 tablespoons of the homemade dressing. Toss gently until the lettuce is evenly coated. This refreshing salad will provide a crispy crunch to your sandwich, balancing beautifully with the crispy chicken.
Step 7: Assemble Sandwiches
To assemble your Chicken Caesar Sandwiches, layer the fried chicken cutlets onto the toasted garlic bread, followed by the tossed salad and a sprinkle of extra Parmesan cheese on top. Close the sandwich, and serve immediately for a delicious, satisfying meal that everyone will love.

Variations & Substitutions for Chicken Caesar Sandwiches
Feel free to mix and match flavors, ingredients, and textures to create a personalized twist on your Chicken Caesar Sandwiches!
- Dairy-Free: Substitute mayo and sour cream with vegan mayo and dairy-free yogurt for a guilt-free treat. Creaminess isn’t sacrificed; enjoy the same delightful flavors!
- Vegetarian Option: Swap the chicken for crispy tofu or grilled portobello mushrooms. These alternatives provide a hearty bite that’s just as satisfying and full of flavor.
- Gluten-Free: Use gluten-free hoagies or make lettuce wraps! This swap allows you to enjoy the same delicious taste while keeping it gluten-free and light.
- Flavor Boost: Add a splash of hot sauce or a sprinkle of crushed red pepper flakes to the dressing for a little kick. Spicy and tangy? Yes, please!
- Extra Crunch: Toss in some crispy bacon or fried shallots for an added texture twist. They complement the creamy dressing and fried chicken with delicious crunchiness.
- Alternative Proteins: Try using grilled shrimp or sliced turkey for a different take on the protein. Each choice brings its unique twist while keeping it deliciously enticing!
- Seasonal Greens: Swap romaine for kale, spinach, or arugula. Each green provides a fresh taste and can give your sandwiches a nutrient boost!
- Herb Variations: Instead of parsley, try fresh basil or cilantro for a new flavor profile. These herbs elevate the overall taste and bring a breath of freshness!
For more protein-rich alternatives, consider a delightful Asian Chicken Cranberry Salad or even switch things up with our Healthy Chicken Salad Puffs. The possibilities are endless, and your creativity will only make these sandwiches more exciting!
Storage Tips for Chicken Caesar Sandwiches
-
Room Temperature: Enjoy your Chicken Caesar Sandwiches freshly assembled for the best flavor and texture. If left out, they should not sit at room temperature for more than 2 hours to ensure food safety.
-
Fridge: Store any leftover sandwiches in an airtight container in the refrigerator for up to 3 days. The chicken may lose some crispiness, but reheating will help.
-
Freezer: If you want to store the chicken cutlets separately, freeze them in a single layer on a baking sheet first, then transfer to an airtight container or freezer bag for up to 2 months.
-
Reheating: To restore the crispiness, reheat the chicken cutlets in an air fryer or oven at 350°F for about 10 minutes. Assemble the Chicken Caesar Sandwiches just before serving for the best taste!
What to Serve with Crispy Chicken Caesar Sandwiches
Complement your meal with delicious sides that elevate your Chicken Caesar Sandwiches into a memorable feast.
-
Crispy Potato Chips: The salty crunch of potato chips adds a satisfying textural contrast, making every bite enjoyable. Pair them with your favorite dip for extra flavor!
-
Garlic Waffle Fries: These crispy, garlic-seasoned waffle fries bring an irresistible flavor that echoes the garlic notes in your sandwiches. Their unique shape holds dips well, making them a fun side dish.
-
Classic Coleslaw: A refreshing and creamy coleslaw dusted with a hint of vinegar adds a tangy crunch, balancing the richness of your sandwich perfectly. It’s a classic combination that everyone loves.
-
Sweet Potato Fries: Sweet and salty, these crispy fries add a delightful touch. Their natural sweetness beautifully complements the savory elements of the Chicken Caesar Sandwiches.
-
Fresh Fruit Salad: Bright, juicy fruits offer a refreshing contrast and cleanse the palate. The natural sweetness of fruits like strawberries, grapes, and pineapple enhances the meal’s overall freshness.
-
Cucumber and Tomato Salad: Light and refreshing, this salad adds a crisp element to your meal. Tossed with a drizzle of olive oil and vinegar, it provides a bright, zesty flavor.
-
Beverage Pairing: Serve with a chilled glass of lemonade or iced tea to quench your thirst and add a refreshing element to your meal. A sparkling drink would also enhance the experience!
Make Ahead Options
These Chicken Caesar Sandwiches are a fantastic meal prep option for busy weeknights! You can bread and fry the chicken cutlets up to 3 days in advance, keeping them crispy by storing them in an airtight container at room temperature (avoid refrigerating to maintain crunch). Prepare the homemade dressing 24 hours ahead and refrigerate it to allow the flavors to meld beautifully. Additionally, wash and chop the romaine lettuce ahead of time, storing it in a sealed bag with a paper towel to absorb moisture. When you’re ready to serve, simply reheat the chicken briefly in the oven for 10 minutes at 350°F to restore its crispness, then assemble your sandwiches with the tossed salad and garlic toast for a delicious meal, just as if you made it fresh!
Expert Tips for Chicken Caesar Sandwiches
-
Fresh Ingredients Matter: Use fresh romaine and quality chicken for the best flavor. Freshness elevates your Chicken Caesar Sandwiches from good to great!
-
Crispier Chicken: Bread the chicken right before frying to ensure maximum crispiness. Stale breading can lead to soggy cutlets.
-
Watch the Oil Temperature: Maintaining the oil temperature at 350°F is crucial for perfect frying. Use a thermometer to avoid greasy or undercooked chicken.
-
Don’t Overcrowd the Pan: Fry in batches if necessary; overcrowding lowers the oil temperature, resulting in unevenly cooked chicken.
-
Toast with Care: Keep an eye on your garlic toast under the broiler; it can go from golden to burnt in seconds!
-
Customize Your Dressing: Feel free to adjust the ingredients in your homemade dressing to suit your taste; more lemon for brightness or extra anchovy paste for bold flavor!

Chicken Caesar Sandwiches Recipe FAQs
What is the best way to select ripe chicken breasts?
Absolutely! Look for chicken breasts that are firm, plump, and have a pinkish hue. Avoid any that have dark spots or an off smell. Fresh chicken should also feel moist, but not slimy.
How should I store leftover Chicken Caesar Sandwiches?
Store any leftover sandwiches in an airtight container in the refrigerator for up to 3 days. It’s best to reheat the chicken in an oven or air fryer to maintain its crispiness. Avoid microwaving, as it can make the bread soggy.
Can I freeze the chicken cutlets used for the sandwiches?
Certainly! To freeze, first, lay the cooled chicken cutlets on a baking sheet in a single layer and place it in the freezer for about 2 hours. Once frozen, transfer them to a freezer-safe bag or container and store for up to 2 months. To reheat, bake at 350°F for about 10 minutes until heated through.
What if my chicken doesn’t turn out crispy?
Very often, this is due to frying at a low temperature. Make sure your oil is at 350°F before adding the chicken. Also, bread the chicken just before frying, as letting it sit can make the coating soggy. If necessary, try frying in smaller batches to maintain the oil temperature.
Are there any dietary considerations for Chicken Caesar Sandwiches?
Yes, if you’re serving this to someone with dietary restrictions, you can easily swap ingredients. Use a flax egg for vegans, gluten-free breadcrumbs for those with gluten sensitivities, and replace anchovy paste with capers for a vegetarian version. Always check labels for allergies related to Worcestershire sauce, as some brands may contain anchovies.
How long can I keep the homemade dressing in the fridge?
The homemade dressing can be stored in an airtight container in the fridge for up to 5 days. To keep flavors fresh, give it a good whisk before serving to re-emulsify the ingredients. Enjoy it on other salads too—the more, the merrier!
Crispy Chicken Caesar Sandwiches for Quick Dinner Bliss
Ingredients
Equipment
Method
- Begin by slicing the chicken breasts horizontally into thin cutlets, about 1/2 inch thick. Set up a breading station by whisking an egg in a shallow bowl, and coating the cutlets in egg before dredging them through a mixture of breadcrumbs and Panko. Ensure every inch is evenly coated for that crispy texture in your Chicken Caesar Sandwiches.
- Heat vegetable oil in a large skillet over medium-high heat, reaching approximately 350°F. Carefully place the breaded chicken cutlets into the hot oil, ensuring they aren't overcrowded. Fry for about 5 minutes or until golden brown and crispy, flipping halfway through for even cooking. Once done, remove the chicken and let it drain on paper towels to absorb excess oil.
- In a separate bowl, melt salted butter and add minced garlic, chopped parsley, and grated Parmesan cheese for a flavorful garlic butter spread. Mix well until combined.
- Slice your hoagies or baguette and spread the garlic butter mixture generously on each side. Preheat your oven to 450°F and place the bread slices on a baking sheet. Toast them in the oven for about 3-4 minutes, watching closely until they become golden and crispy.
- In a medium bowl, whisk together the mayonnaise, sour cream, grated Parmesan, lemon juice, Dijon mustard, anchovy paste, Worcestershire sauce, and grated garlic until smooth and creamy.
- In a large bowl, combine chopped romaine lettuce with 3-4 tablespoons of the homemade dressing. Toss gently until the lettuce is evenly coated.
- To assemble your Chicken Caesar Sandwiches, layer the fried chicken cutlets onto the toasted garlic bread, followed by the tossed salad and a sprinkle of extra Parmesan cheese on top. Close the sandwich, and serve immediately.
Leave a Reply