
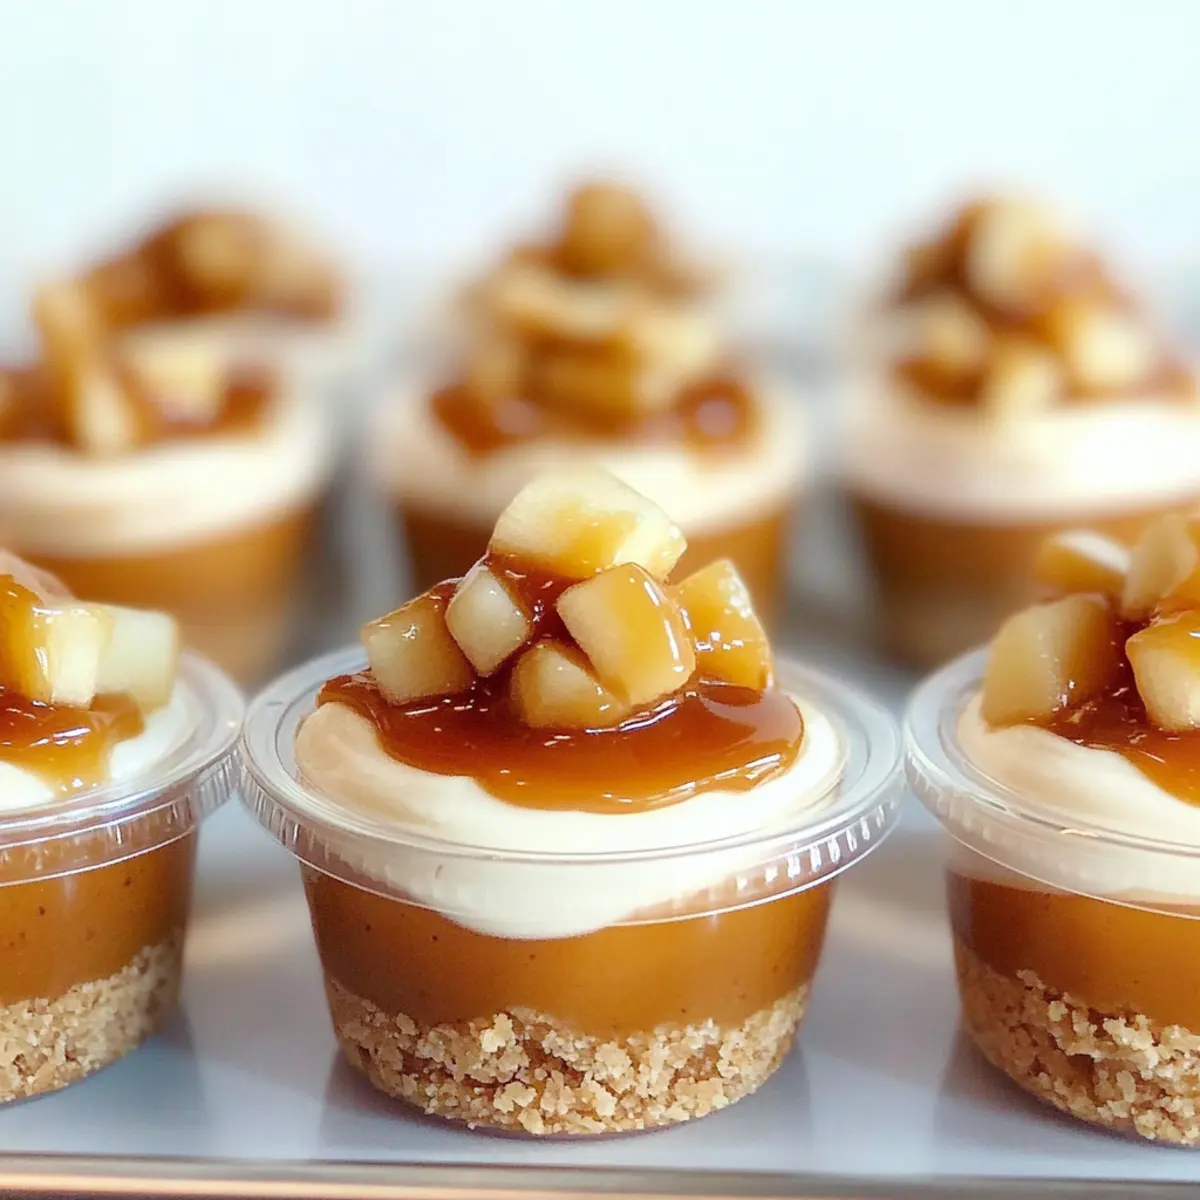
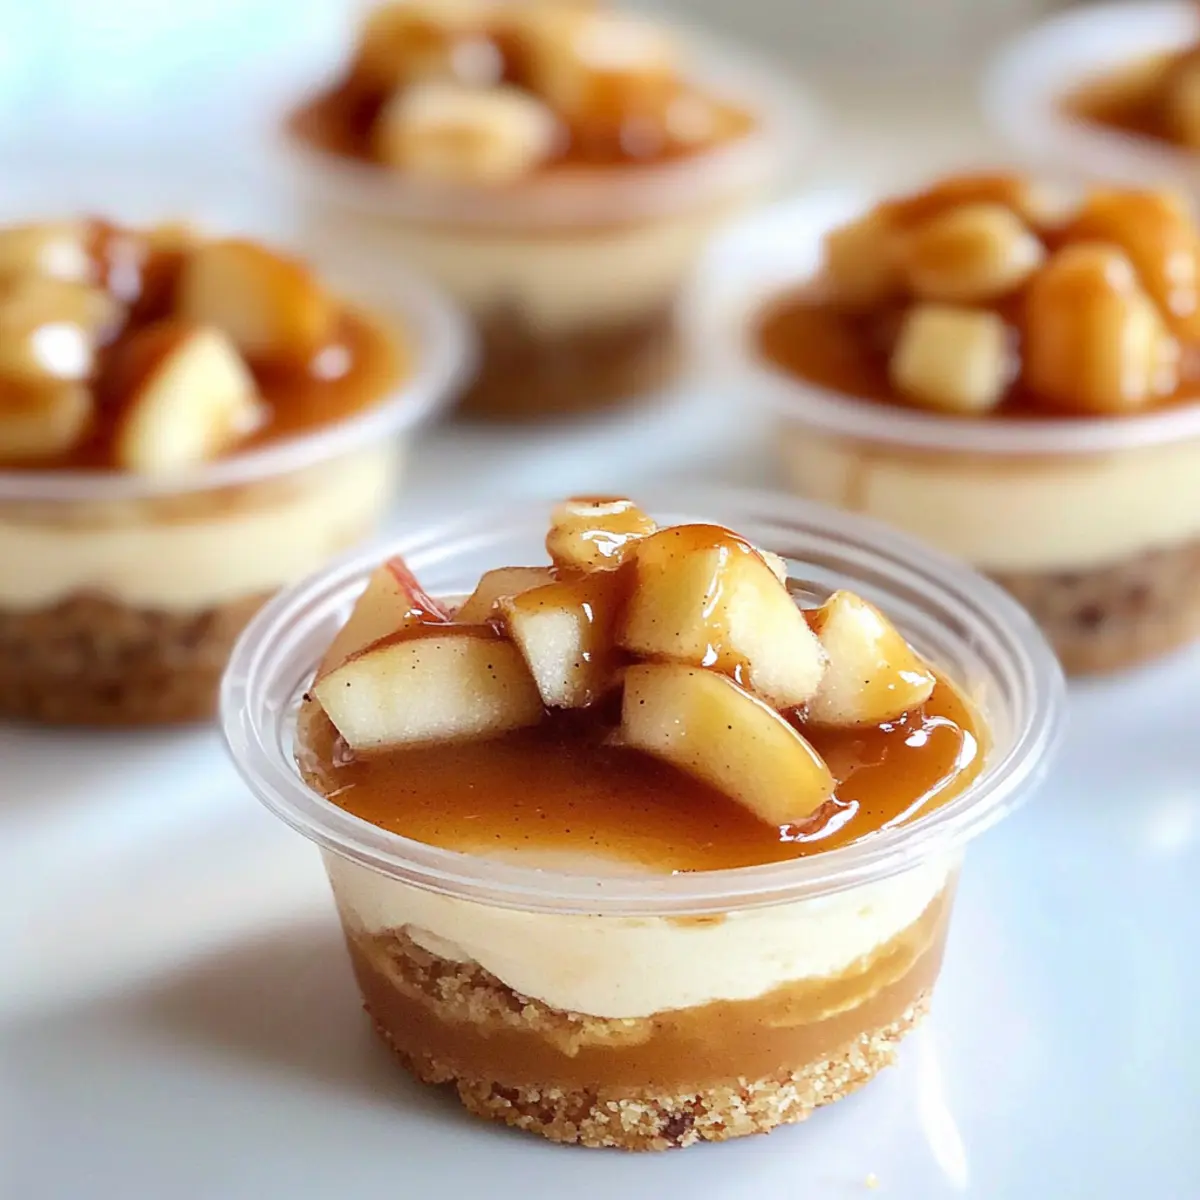
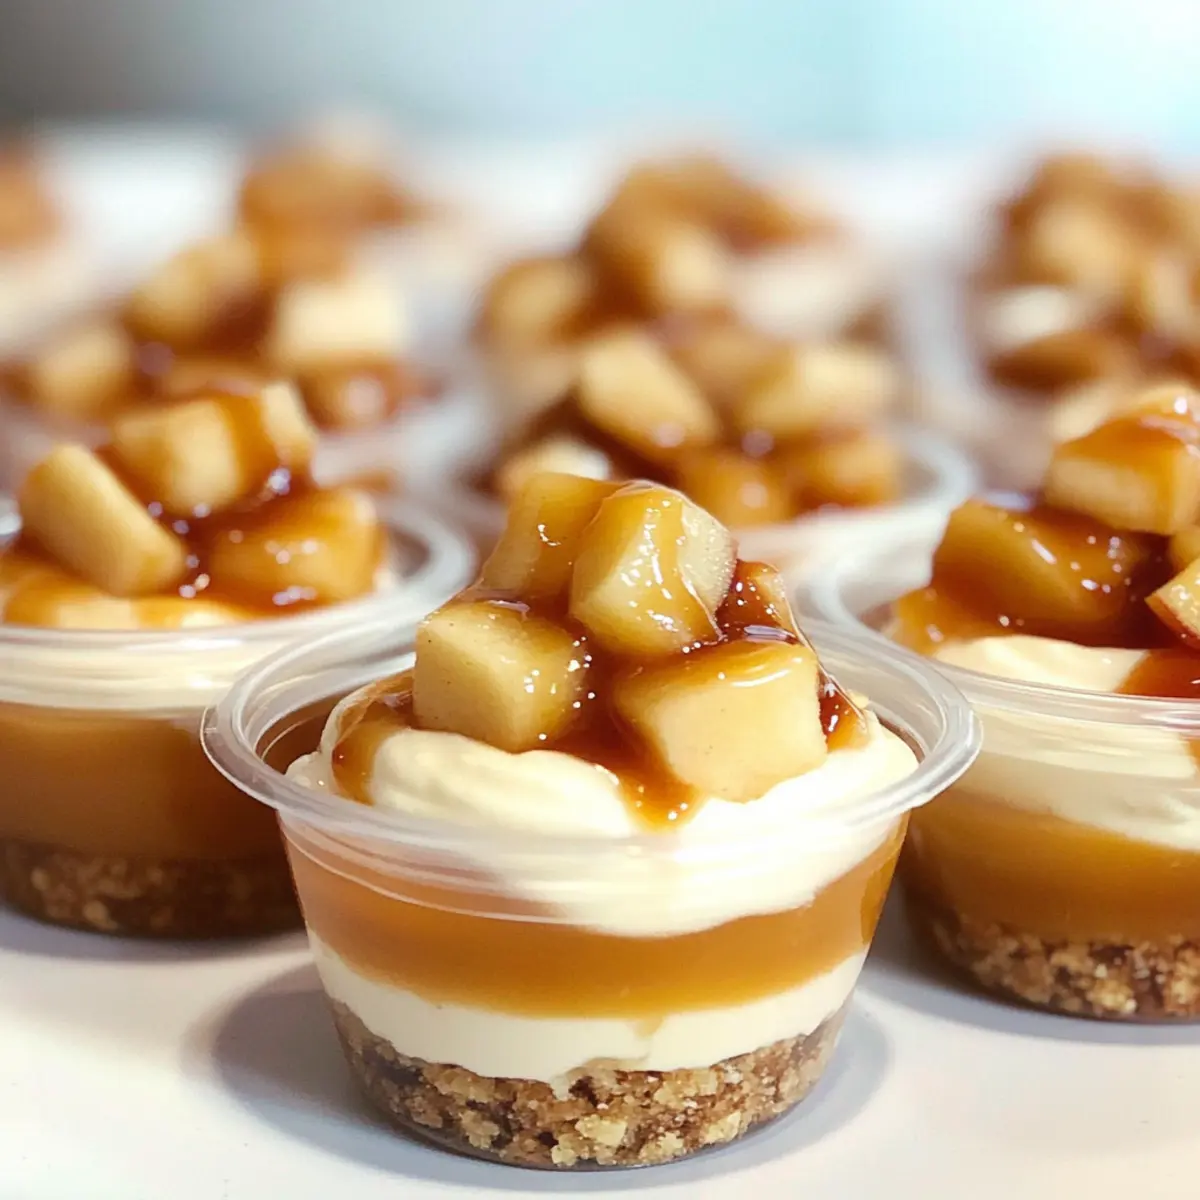
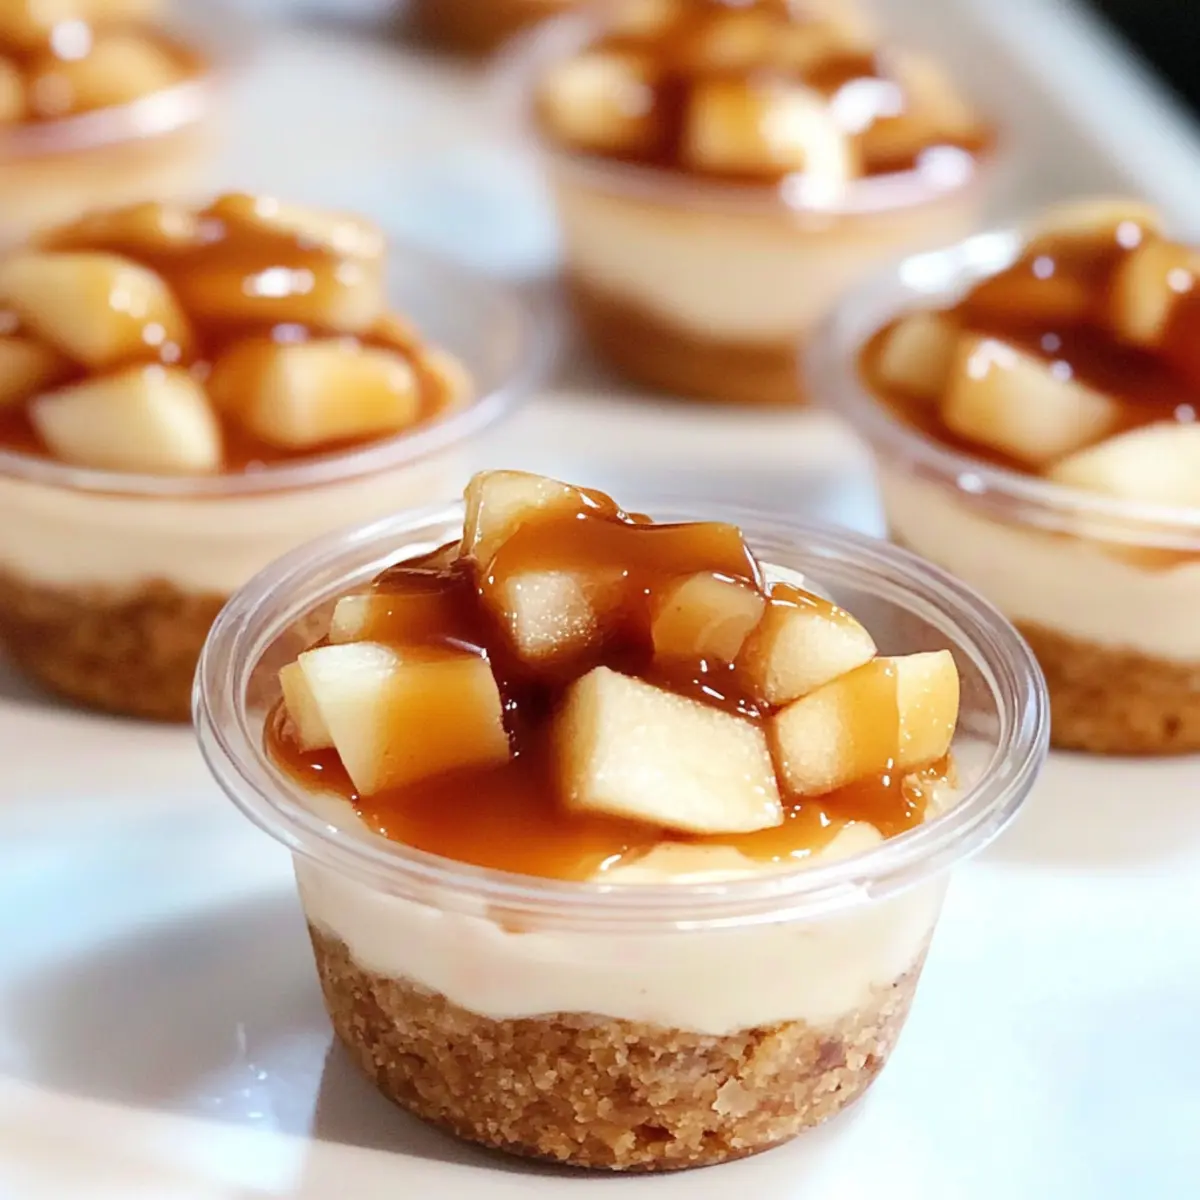
A portable dessert that captures autumn in every bite? Yes, please! These No Bake Caramel Apple Dessert Cups are a symphony of textures and flavors, featuring a crunchy vanilla wafer crust, airy salted caramel mousse, and warm cinnamon apples. They carry the spirit of a classic caramel apple, reimagined as a sleek, easy-to-eat treat that requires zero baking—perfect for gatherings or cozy nights at home. Not only are they quick to whip up, but they also lend a touch of elegance to your dessert table without the fuss. Plus, with each cup holding around 143 calories, you can indulge without any guilt. So, who’s ready to bring a taste of fall to the table? Let’s dive into this delightful recipe!
Why Not Make Dessert Delightfully Easy?
Simplicity at Its Finest: These no bake Caramel Apple Dessert Cups require minimal time and effort, making them the perfect solution for busy hosts or weeknight cravings.
Flavor Explosion: The seamless blend of creamy salted caramel mousse with the warmth of cinnamon apples creates a taste that will have everyone asking for seconds.
Elegant Presentation: Serve them up in individual cups, and you’ll impress guests without breaking a sweat—perfect for potlucks or dinner parties!
Versatile Options: Feel free to explore other toppings or variations! For a change, consider caramelized bananas, or take a spin on classic flavors with these tasty Cinnamon Apple Fritters.
Crowd Pleaser: Whether it’s a holiday gathering or a cozy family dinner, these little cups are sure to delight everyone at the table!
Caramel Apple Dessert Cups Ingredients
For the Cinnamon Apples
• Crispin/Granny Smith/Pink Lady Apples – Choose tart varieties for a delightful balance of sweetness and spice.
• Brown Sugar – Helps caramelize the apples and enhances their natural sweetness.
• Ground Cinnamon – Adds a warm, cozy flavor that pairs perfectly with apples.
For the Crust
• Vanilla Wafer Crumbs – Provides a sweet and crunchy base; graham cracker crumbs are a fine alternative.
• Butter – Binds the crust, ensuring it holds together; both salted and unsalted work well.
For the Creamy Mousse
• Instant Vanilla Pudding Mix – Essential for thickening the mousse while adding creaminess.
• Milk – Hydrates the pudding mixture; any type of milk works, including dairy and non-dairy options.
• Salted Caramel Sauce – Adds rich, decadent flavor to the mousse; feel free to use store-bought or your own creation.
• Heavy Cream – Whipped to create a light, airy texture; ensure it’s cold for best whipping results.
For Topping
• Additional Caramel Sauce – Use for drizzling atop the dessert cups; adjust quantity based on personal taste.
These Caramel Apple Dessert Cups are not only easy to prepare but also incredibly delicious, ensuring you can bring the essence of fall to your gatherings!
Step‑by‑Step Instructions for Caramel Apple Dessert Cups
Step 1: Prepare the Cinnamon Apples
In a medium saucepan, combine chopped Crispin, Granny Smith, or Pink Lady apples with brown sugar and ground cinnamon over medium heat. Cook for about 5-7 minutes until the apples soften and the liquid thickens; stir occasionally. Once fragrant and tender, remove from heat and allow the mixture to cool completely before assembling your Caramel Apple Dessert Cups.
Step 2: Make the Crust
While your apple mixture cools, melt butter in a microwave-safe bowl. In another bowl, combine the vanilla wafer crumbs with the melted butter, mixing until fully incorporated. Evenly press this crumb mixture into the bottom of 28 plastic cups using your fingers or the back of a spoon, creating a solid crust that will hold up with the filling.
Step 3: Prepare the Pudding Mixture
In a large mixing bowl, whisk together instant vanilla pudding mix and milk until well combined. Allow this mixture to sit for 5 minutes, allowing the pudding to thicken. This step is crucial for achieving the creamy consistency needed for your Caramel Apple Dessert Cups, so be sure you see it begin to set.
Step 4: Combine with Caramel Sauce
Once the pudding has thickened, gently fold in the salted caramel sauce. Use a spatula to mix until the caramel is fully incorporated and the pudding is smooth and creamy. This luscious combination will be the highlight of your dessert, bringing a rich flavor to the Caramel Apple Dessert Cups.
Step 5: Whip the Heavy Cream
In a separate bowl, pour in the cold heavy cream and whip it with an electric mixer on high speed for about 3-5 minutes until stiff peaks form. This gives your mousse its light, airy texture. Fold the whipped cream into the caramel-pudding mixture gently to maintain the fluffiness, ensuring the mousse is beautifully creamy.
Step 6: Assemble the Dessert Cups
Using a piping bag or a spoon, carefully pipe or spoon the caramel mousse into the prepared cups over the crust layer, filling them generously. Top each cup with a generous spoonful of your cooled cinnamon apple mixture, letting the apples rest nicely on top of the mousse. This will create a lovely layered effect in your Caramel Apple Dessert Cups.
Step 7: Final Touch and Chill
For an extra touch of decadence, drizzle additional caramel sauce atop the cinnamon apples if desired. Seal each cup with a lid or plastic wrap and refrigerate for at least 1 hour to allow flavors to meld and the dessert to chill. This step is key for ensuring a refreshing treat ready to be enjoyed at serving time.
Make Ahead Options
These Caramel Apple Dessert Cups are perfect for meal prep, allowing you to spend less time in the kitchen when hosting or enjoying a sweet treat! You can prepare the cinnamon apple mixture and the vanilla wafer crust up to 24 hours in advance; just refrigerate them separately to maintain the right texture. The creamy salted caramel mousse can be made a day ahead as well; simply store it in an airtight container in the fridge. When you’re ready to serve, layer the mousse into the cups, top with the cinnamon apples, drizzle with extra caramel sauce, and chill for another hour for the best results. With these make-ahead options, you’ll savor delightful, homemade desserts effortlessly!
Caramel Apple Dessert Cups Variations
Feel free to get creative and personalize your Caramel Apple Dessert Cups with these fun twists!
-
Dairy-Free: Use coconut cream instead of heavy cream and almond milk for a deliciously rich alternative. Your dessert will be just as creamy and satisfying!
-
Nutty Crunch: Add crushed pecans or walnuts to the crust for an extra crunch and nutty flavor that complements the apples beautifully.
-
Flavor Boost: Swap out the vanilla pudding for cheesecake pudding to elevate the dessert with a creamy, tangy twist.
-
Fruit Variations: Substitute cinnamon apples with caramelized bananas or poached pears for a delightful change that’s still fruit-forward.
-
Spice It Up: Add a dash of nutmeg or ginger to the apple mixture for a spicy kick that brightens up the traditional flavor profile.
-
Extra Caramel: Drizzle more caramel sauce not only on top but also swirl it into the mousse for pockets of extra sweetness throughout!
-
Chocolate Lovers: Fold in mini chocolate chips with the mousse for a delightful contrast of flavors that chocolate enthusiasts will adore.
Celebrating the beauty of personalization, these delightful variations allow you to cater to every taste and occasion—just like any good dessert should! If you want more options, check out these tempting Cinnamon Apple Fritters that offer quick and tasty alternatives for fall flavors!
Tips for the Best Caramel Apple Dessert Cups
Chill Time Matters: Allow the assembled cups to chill for at least 1 hour to enhance flavors and ensure a refreshing treat.
Mousse Perfection: Make sure to whip the heavy cream until it forms stiff peaks for a light and airy mousse in your Caramel Apple Dessert Cups.
Mix with Care: When folding the whipped cream into the pudding mixture, do so gently to maintain that lovely, fluffy texture.
Strain Apples if Needed: If your cinnamon apple mixture is too runny, let it cool longer or strain before adding it to the cups.
Cup Size Matters: Consider using smaller cups if serving at a large gathering—this way, guests can enjoy portion control while sampling desserts!
How to Store and Freeze Caramel Apple Dessert Cups
Fridge: Keep the dessert cups covered in the refrigerator for up to 3 days. The flavors actually deepen after a day, making each bite even more delightful.
Freezer: For longer storage, freeze the cups without the cinnamon apple topping for up to 2 months. Let them thaw overnight in the fridge before serving.
Reheating: It’s best served cold, so there’s no need to reheat. Just take them out of the fridge, and they’re ready to impress at any gathering!
Airtight Storage: Use an airtight container to ensure the crust stays crispy and the mousse remains fluffy until you’re ready to indulge in these Caramel Apple Dessert Cups.
What to Serve with No Bake Caramel Apple Dessert Cups
Imagine the harmony of flavors and textures that can accompany your sweet treat, creating a delightful dining experience for everyone.
-
Warm Apple Crisp: A crunchy topping with buttery oats enhances the apple flavor, creating a cozy autumnal feel at the table. Pairing this with the dessert cups creates a comforting dessert experience.
-
Spiced Hot Cider: The warmth and spices of this drink evoke fall feelings and perfectly balance the sweet richness of the dessert cups. Sipping on this while enjoying your treat creates an irresistible pairing.
-
Vanilla Ice Cream: Creamy vanilla ice cream brings a delightful cold contrast to the warm cinnamon apples. The melting ice cream will spill over the cups, creating a deliciously messy moment!
-
Caramel Drizzle Popcorn: Crunchy popcorn coated in caramel offers a sweet and salty twist that echoes the flavors of your dessert. It’s a crunchy, fun snack that enhances your dessert theme.
-
Nutty Granola Parfait: Layered with yogurt, this fresh, zesty parfait complements the dessert cups and balances out the indulgence with a crunchy texture. It adds a lightness that’s wonderful for guests wanting a bit of balance.
-
Coffee or Espresso: The robust flavors of coffee or espresso provide a rich, slightly bitter contrast to the sweetness of the dessert cups. It’s an elegant way to round off a meal.
-
Pumpkin Spice Muffins: These muffins carry warm spices that echo the dessert flavors, creating a lovely synergy. They are a fun, festive addition to any gathering, encapsulating the essence of fall.
-
Chocolate Dipped Pretzels: For a sweet and salty surprise, these add a satisfying crunch and may entice anyone looking for a playful snack alongside their caramel apple cups.
-
Chai Latte: The comforting spices of a chai latte introduce a warm aromatic element, making every bite of dessert feel like a cozy hug.
-
Apple Pie Slices: An iconic fall dessert, serving slices of tender apple pie with a scoop of vanilla ice cream can beautifully complement the caramel apple dessert cups for those craving more apple goodness!
Caramel Apple Dessert Cups Recipe FAQs
How do I select the best apples for this recipe?
Absolutely! For the best flavor balance, I recommend using tart apples like Crispin, Granny Smith, or Pink Lady. These varieties provide the perfect contrast to the sweet caramel mousse, making each bite irresistible.
What’s the best way to store leftover Caramel Apple Dessert Cups?
Keep your dessert cups covered in the refrigerator for up to 3 days. The flavors actually get better as they chill, so don’t worry if they sit for a day or two—each bite becomes a delightful treat!
Can I freeze Caramel Apple Dessert Cups?
Yes, you can! To freeze, assemble the dessert cups and leave off the cinnamon apple topping. Place them in an airtight container and freeze for up to 2 months. When you’re ready to enjoy them, simply thaw in the fridge overnight before serving.
What should I do if the apple mixture is too watery?
If you notice your cinnamon apple mixture is too runny, don’t fret! Let it cool longer to thicken, or strain it through a fine mesh sieve to remove excess liquid before spooning it over the mousse in your dessert cups. This way, you’ll avoid a soggy crust and maintain that delightful crunch!
Are there any dietary considerations for this recipe?
Always good to check—people with lactose intolerance can substitute with non-dairy milk in the pudding mix and use coconut whipping cream to create a delicious dairy-free mousse. Remember, the salted caramel sauce can also be found in dairy-free versions at most supermarkets.
Can I adjust the amount of caramel sauce in the recipe?
The more the merrier! Feel free to adjust the quantity of salted caramel sauce to your taste. If you’re a fan of caramel, drizzling extra on top of the cups will only enhance that sweet flavor—go for it!
Indulge in No Bake Caramel Apple Dessert Cups Today
Ingredients
Equipment
Method
- In a medium saucepan, combine chopped apples, brown sugar, and ground cinnamon over medium heat. Cook for about 5-7 minutes until softened, then cool completely.
- Melt butter in a bowl. Combine vanilla wafer crumbs with melted butter, mix, and press evenly into the bottoms of 28 cups.
- In a large bowl, whisk together instant pudding mix and milk until well combined. Let it sit for 5 minutes to thicken.
- Once thickened, gently fold in the salted caramel sauce until smooth and creamy.
- Whip the heavy cream in a separate bowl until stiff peaks form. Fold whipped cream into the caramel-pudding mixture gently.
- Spoon the mousse into the prepared cups over the crust, then top with the cooled apple mixture.
- Drizzle additional caramel sauce on top if desired, cover, and refrigerate for at least 1 hour before serving.
Leave a Reply