
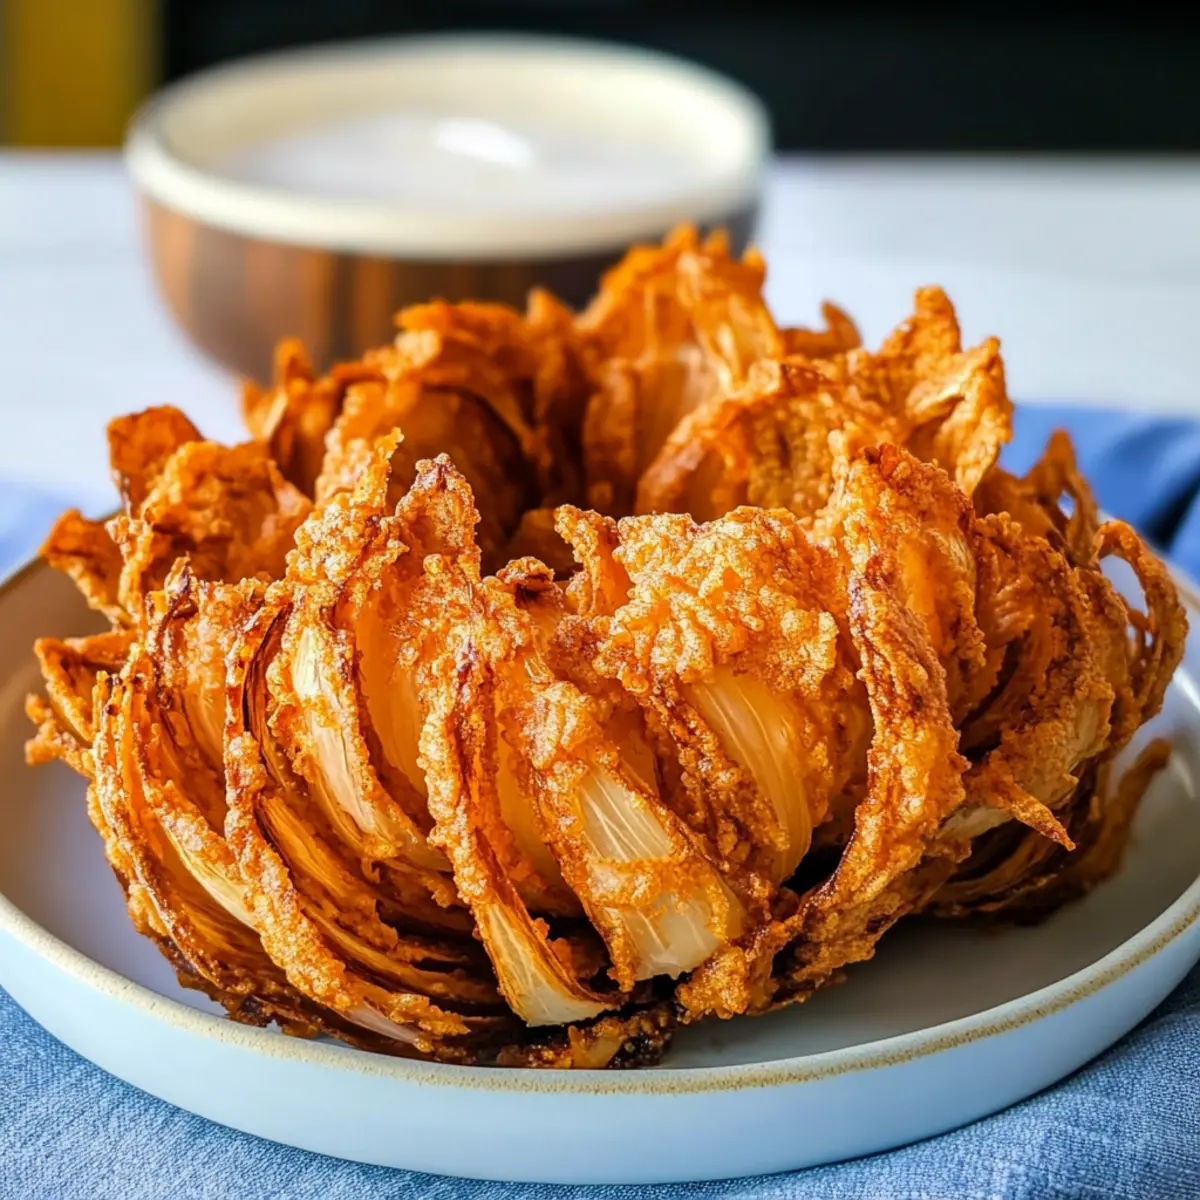
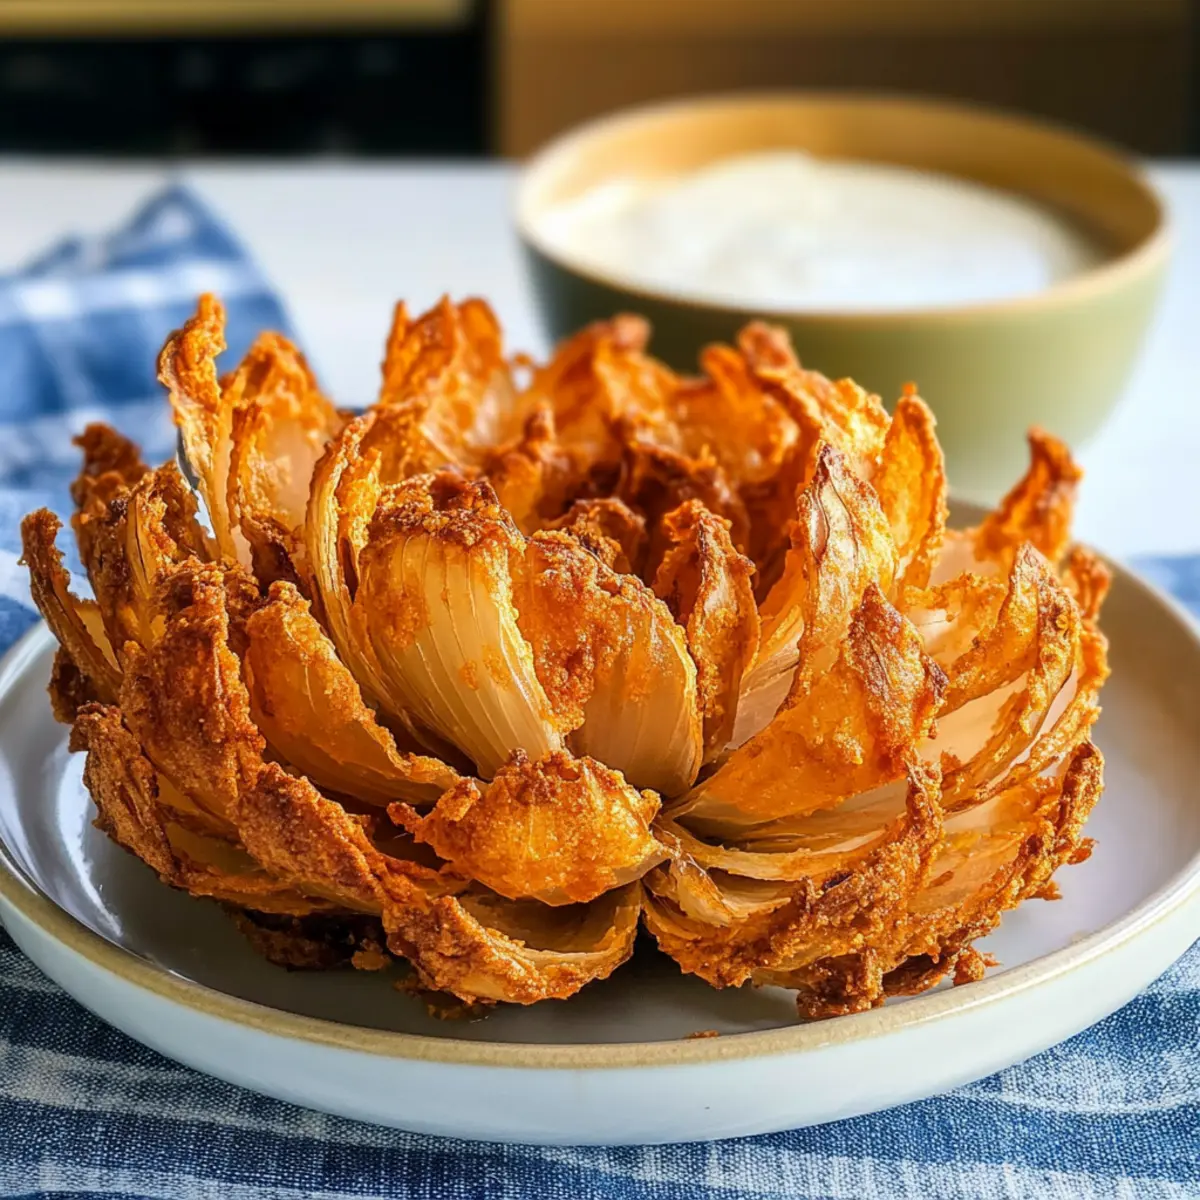
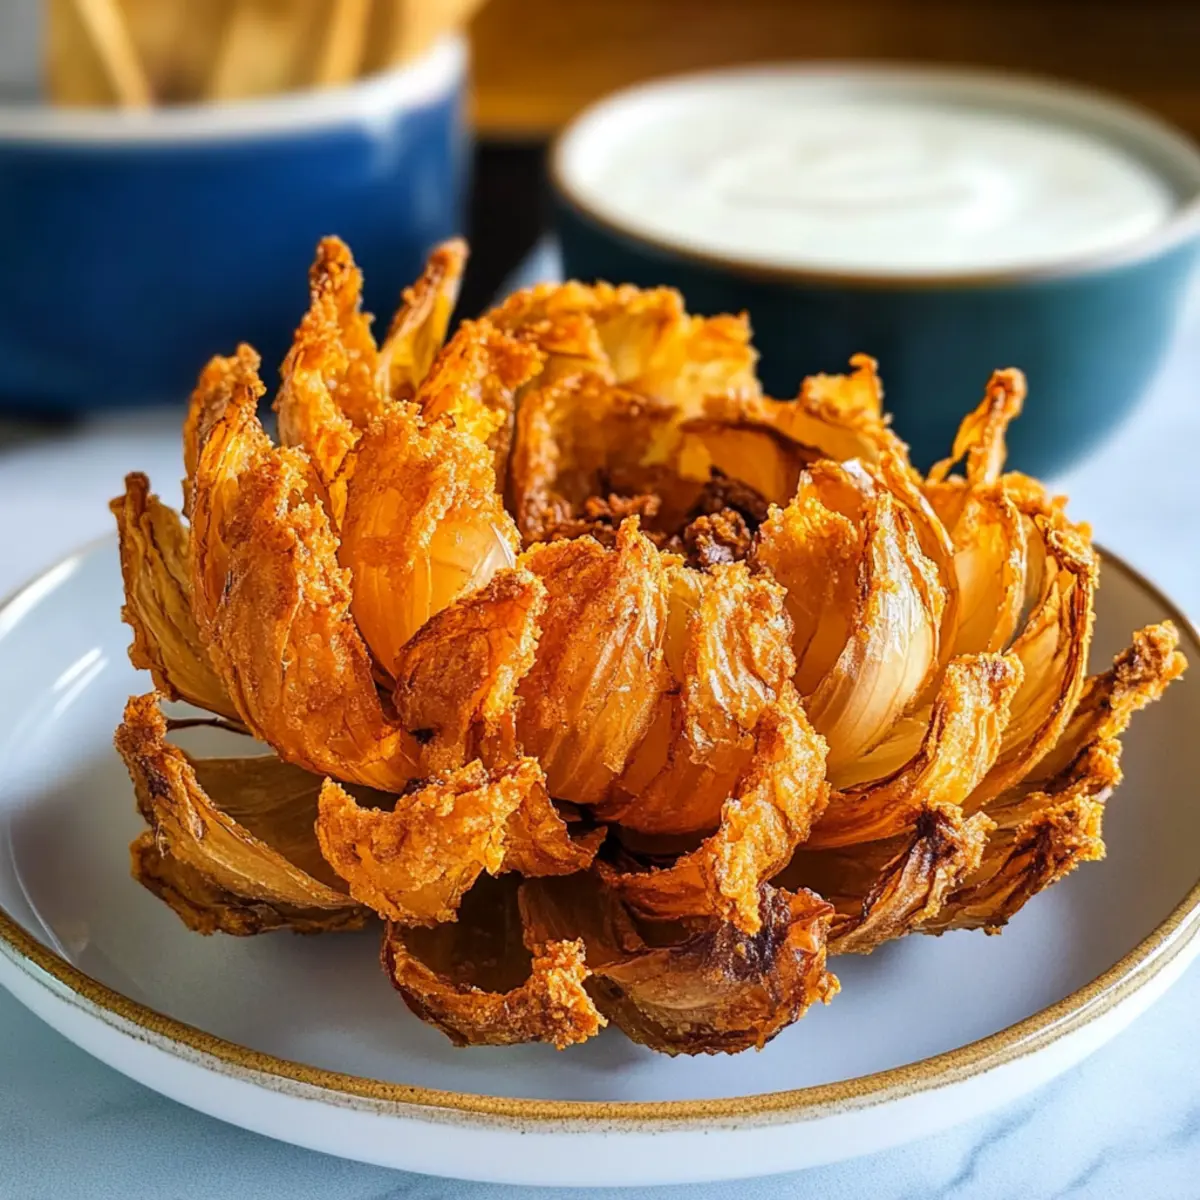
As I stood in the kitchen, the tantalizing aroma of crispy goodness filled the air—my secret weapon for game day! This Air Fryer Blooming Onion is not just another indulgent appetizer; it’s a healthier take on that restaurant classic we all crave, minus the guilt. Crafted with a large sweet onion and a touch of spice, each petal crisps up beautifully, offering an irresistible crunch that’s perfect for sharing (if you can bring yourself to!). It comes together quickly, making it a splendid last-minute treat for family gatherings or a fun snack while cheering on your favorite team. So, are you ready to impress your guests with this easy-to-make culinary masterpiece? Let’s dive in!
Why Is This Recipe a Must-Try?
Healthy Indulgence: Enjoy all the crispy goodness of a blooming onion without the guilt. Air frying significantly reduces the fat content while preserving that satisfying crunch.
Crowd-Pleasing Flavor: With the right combination of spices, this appetizer boasts a flavor that pairs perfectly with a variety of dips, making it a sure hit at any gathering.
Simple Steps: This recipe is surprisingly straightforward, making it great for both novice cooks and seasoned pros. In no time, you’ll present a stunning dish to your guests!
Versatile Dipping Options: Choose from creamy ranch, tangy barbecue, or even a spicy aioli—tailor the pairing to suit your tastes or the theme of your gathering.
Quick and Easy: Ready in under 30 minutes, it’s perfect for those last-minute snack cravings or game day preparations. For even more flavor-packed snacks, check out our Air Fryer Zucchini or French Onion Soup recipes!
Air Fryer Blooming Onion Ingredients
For the Onion
• Large Sweet Onion – Choose a large, firm onion for optimal blooming and flavor.
For the Coating
• All-Purpose Flour (2 ½ cups) – This gives the onion its crispy exterior; swap for gluten-free flour if needed.
• Paprika (1 tablespoon) – Adds color and mild flavor; smoked paprika can be used for a smoky twist.
• Cayenne Pepper (1 teaspoon) – Brings in the heat; adjust according to your spice preference.
• Ground Cumin (½ teaspoon) – Adds earthy depth; feel free to omit or substitute with your favorite spice.
• Dried Thyme (½ teaspoon) – Complements the onion’s flavor; can be substituted with Italian seasoning.
• Dried Oregano (½ teaspoon) – Enhances the overall taste profile; replace with fresh herbs for more vibrancy.
For the Binding
• Eggs (2 large) – Essential for binding the flour to the onion; no substitutes recommended.
• Milk (1 cup) – Used in the egg wash; for a dairy-free version, opt for plant-based milk.
• Water (1 cup) – Complements the milk to create a smooth egg wash.
For Seasoning
• Salt and Pepper – Season to your liking for the perfect flavor balance.
For Cooking
• Oil in a Spray Bottle – Lightly mist the onion before cooking; avoid aerosol oils to protect your air fryer.
Gather these ingredients, and get ready to create a stunning Air Fryer Blooming Onion that will leave everyone wanting more!
Step‑by‑Step Instructions for Air Fryer Blooming Onion
Step 1: Prepare the Onion
Start by cutting off about ½ inch from the top of a large sweet onion and carefully peel away the outer skin. Place the onion root-side down on a cutting board, ensuring it’s stable. Using a sharp knife, make four evenly spaced cuts down towards the root, without cutting through it, followed by three additional cuts in each section to create 16 distinct petals that will bloom beautifully in the air fryer.
Step 2: Relax the Petals
After cutting the onion, let it sit for about 5 minutes to allow the petals to relax slightly. This will help them separate more easily during cooking. You should see the petals starting to fan out, resembling a blooming flower, setting the stage for your Air Fryer Blooming Onion to shine.
Step 3: Mix the Coating
In a large mixing bowl, whisk together 2 ½ cups of all-purpose flour, 1 tablespoon of paprika, 1 teaspoon of cayenne pepper, ½ teaspoon of ground cumin, ½ teaspoon of dried thyme, and ½ teaspoon of dried oregano. This flavorful mix will create a crispy exterior for your blooming onion, enhancing its taste with a delightful spice blend.
Step 4: Prepare the Egg Wash
In a separate bowl, whisk together 2 large eggs, 1 cup of milk, and 1 cup of water until well combined. This egg wash will help adhere the flour mixture to the onion. Ensure it is smooth and evenly mixed, as this will play a key role in achieving that crispy, golden texture.
Step 5: Coat the Onion
Carefully coat the onion petals with the flour mixture, ensuring to get some in between each petal for maximum coverage. Afterward, dip the entire onion into the egg wash, allowing any excess to drip off. Return the onion to the flour mix for a second coat, ensuring it’s generously covered before proceeding to the next step.
Step 6: Chill and Preheat
Once coated, place the onion in the refrigerator for about 10 minutes while you preheat your air fryer to 350°F. This chill time helps set the coating, leading to an even crispier finish. It’s essential to preheat the air fryer to ensure the best cooking results, so don’t skip this important step!
Step 7: Prepare for Air Frying
After chilling, lightly spray the coated onion with oil using a refillable spray bottle for even coverage. To make transferring easier, create a sling using aluminum foil to hold the onion. Gently place the onion in the air fryer basket, positioned upright and secure, ready for cooking.
Step 8: Air Fry the Onion
Set the air fryer to cook the blooming onion for 20-25 minutes. During the cooking process, spray the onion with oil 2-3 times to enhance crunchiness and achieve a rich, golden brown color. Around the halfway mark, you might want to check on it to ensure even cooking and maximum crispiness.
Step 9: Serve and Enjoy
Once the Air Fryer Blooming Onion is beautifully golden brown and crispy, carefully use the aluminum foil sling to remove it from the air fryer. Let it cool slightly before serving it warm with your favorite dipping sauce. The stunningly crispy petals are perfect for sharing, making this appetizer a showstopper at any gathering!
Expert Tips for Air Fryer Blooming Onion
-
Sharp Knife Needed: Use a sharp knife to achieve clean cuts in the onion without crushing the base. This ensures a better bloom during cooking.
-
Preheat for Perfection: Always preheat your air fryer; it’s essential for achieving that irresistibly crispy texture in your Air Fryer Blooming Onion.
-
No Aerosol Oils: Stick to a refillable spray bottle for oil. Aerosol oils can affect your air fryer’s performance and cooking results.
-
Spray for Even Crispiness: If you notice some flour spots during cooking, don’t hesitate to spray those areas with oil for a more uniform crisp.
-
Let It Chill: Refrigerate the onion after coating it before air frying. This step helps the coating adhere better and enhances texture.
Air Fryer Blooming Onion Variations
Feel free to get creative and customize your Air Fryer Blooming Onion to suit your taste preferences and dietary needs!
-
Gluten-Free: Substitute all-purpose flour with gluten-free flour for a delightful gluten-free version that still packs a crunch. You won’t miss the traditional flour at all!
-
Onion Variety: Swap the large sweet onion for a medium red or yellow onion to explore different flavor profiles. Each onion brings its unique character, enhancing your dish in unexpected ways.
-
Spice it Up: Add a pinch of garlic powder or onion powder to the flour coating for a flavor boost that elevates this classic snack. Your guests will be guessing the secret ingredient!
-
Smoky Delight: Use smoked paprika instead of regular paprika for a deeper, smoky taste that can make your blooming onion even more irresistible. Pair this with a zesty dipping sauce for balance!
-
Herb Options: Instead of dried thyme and oregano, reach for Italian seasoning for a burst of herbaceous flavor. Each unique blend will create an exciting twist every time you make it.
-
Plant-Based Version: Replace the eggs in the binding with a flax seed or chia seed mixture to make your blooming onion entirely plant-based and vegan-friendly. Just mix one tablespoon of flax meal or chia seeds with three tablespoons of water to substitute for each egg!
-
Dipping Sauce Variety: Serve your blooming onion with various dipping sauces like tangy barbecue sauce or a spicy aioli for a different experience at each gathering. Experiment with flavors and watch your guests come back for more!
-
Extra Crunch: For an even crispier exterior, consider adding breadcrumbs to the flour mixture. This adds an extra layer of texture that can take your blooming onion to the next level.
And while you’re at it, you can complement this dish with my delightful Onion Goat Cheese Tarts or try our epic French Onion Soup for a true onion lover’s feast!
How to Store and Freeze Air Fryer Blooming Onion
Fridge: Store leftovers in an airtight container in the fridge for up to 2 days. The onion may lose some of its crispiness, but it will still be tasty!
Freezer: For longer storage, freeze the uncooked, coated onion on a baking tray until solid, then transfer to a freezer bag for up to 1 month.
Reheating: When ready to enjoy, air fry the frozen blooming onion at 350°F for 12-15 minutes, or until heated through and crispy again.
Room Temperature: It’s best to enjoy your Air Fryer Blooming Onion fresh; keeping it at room temperature for more than an hour may affect quality.
Make Ahead Options
These Air Fryer Blooming Onions are perfect for meal prep enthusiasts looking to save time on busy weeknights! You can prepare the onion and coat it with the flour mixture up to 24 hours in advance; simply complete the first five steps of the recipe and then refrigerate the coated onion, ensuring it’s well covered to maintain its freshness. When you’re ready to serve, just preheat the air fryer (you can do this while the onion chills), lightly spray the onion with oil, and air fry it for 20-25 minutes until golden brown. This way, you’ll have a delicious, restaurant-style appetizer with minimal effort on the day of your gathering!
What to Serve with Air Fryer Blooming Onion
The perfect accompaniments can transform your crispy appetizer into a memorable meal experience.
-
Creamy Ranch Dip: This classic dip provides a cool and creamy contrast, enhancing the onion’s crispy texture. It’s a fan favorite for a reason!
-
Spicy Aioli: Elevate your dish with a zesty aioli that adds a delightful kick, perfect for those who enjoy a bit of heat alongside their crunch.
-
Garlic Parmesan Fries: Crispy, golden fries sprinkled with garlic and parmesan complement the savory sweetness of the blooming onion. It’s a duo that always pleases!
-
Tangy Barbecue Sauce: The smoky depth of barbecue sauce pairs beautifully with the blooming onion, balancing its rich flavors and offering a sweet undertone.
-
Fresh Garden Salad: A light, refreshing salad adds a burst of freshness, contrasting the warm, crispy onion. Choose simple greens with a tangy vinaigrette for a delightful balance.
-
Bubble Tea or Sparkling Lemonade: For drinks, offer fruity bubble tea or a sparkling lemonade for a fun twist that contrasts with the savory appetizers. These beverages bring a vibrant touch to your gathering!
Air Fryer Blooming Onion Recipe FAQs
How do I choose the perfect onion for blooming?
Absolutely! Look for a large sweet onion that is firm and without soft spots. The onion should feel heavy for its size, and a smooth, dry outer skin is best. Avoid any onions with dark spots, as these may affect the flavor and texture when cooked.
How should I store leftovers from the Air Fryer Blooming Onion?
To keep your Air Fryer Blooming Onion fresh, store any leftovers in an airtight container in the refrigerator for up to 2 days. While the flavor will still be delightful, the crispiness may diminish, so I recommend reheating it in the air fryer to restore some of that crunch!
Can I freeze my Air Fryer Blooming Onion, and how?
Yes, you can freeze your blooming onion! Prepare the onion and coat it as instructed, then place it on a baking tray and freeze until solid. Once frozen, transfer it to a freezer bag and store it for up to 1 month. When you’re ready to enjoy it, air fry straight from the freezer at 350°F for about 12-15 minutes until crispy and heated through.
What should I do if my onion doesn’t bloom properly?
If your onion doesn’t bloom as expected, it could be due to uneven cuts or not letting the petals relax before cooking. Next time, make sure your cuts are clean and avoid cutting through the root entirely. If you notice some petals are sticking together, gently separate them before cooking and allow the onion to sit for 5 minutes as suggested.
Are there any dietary considerations I should be aware of?
Indeed! If you’re making this for someone with gluten sensitivities, feel free to substitute the all-purpose flour with a gluten-free flour blend. For a dairy-free option, simply replace milk with your preferred plant-based milk. Just remember that the egg is essential for binding, so no substitutes are recommended for that ingredient. Enjoy your indulgent Air Fryer Blooming Onion without worries!

Air Fryer Blooming Onion: Crispy Delight, Guilt-Free Treat
Ingredients
Equipment
Method
- Cut off about ½ inch from the top of the onion and peel away the outer skin. Place the onion root-side down and make four evenly spaced cuts down towards the root, then three additional cuts in each section to create 16 petals.
- Let the onion sit for about 5 minutes to allow the petals to relax.
- In a large mixing bowl, whisk together all-purpose flour, paprika, cayenne pepper, ground cumin, dried thyme, and dried oregano.
- In a separate bowl, whisk together eggs, milk, and water until well combined.
- Coat the onion petals with the flour mixture, dip it into the egg wash, and coat it again with the flour mix.
- Refrigerate the coated onion for about 10 minutes while preheating your air fryer to 350°F.
- Lightly spray the coated onion with oil and place it upright in the air fryer basket.
- Cook the onion for 20-25 minutes, spraying with oil 2-3 times during cooking.
- Once golden brown and crispy, carefully remove the onion from the air fryer and let it cool slightly before serving.
Leave a Reply